Calibrate Intrinsics
Intrinsics describe the camera's lens: focal length, image center, and distortion. EagleEye needs them to turn a tag in the image into a distance and angle. Without intrinsics, the PnP and temporal acceleration nodes refuse to start.
EagleEye has a built-in ChArUco calibration tool in the Utils tab. You do not need an external service.
Calibrate each camera separately. If you swap a camera or change its lens or resolution, calibrate again.
1. Print a ChArUco board
The calibration defaults expect a ChArUco board with:
| Setting | Default |
|---|---|
| Squares X | 11 |
| Squares Y | 8 |
| Square size | 0.015 m |
| Marker size | 0.011 m |
| Marker dictionary | 4x4_50 |
Print a board and then measure the printed squares and markers with a ruler. Printers scale. The numbers you enter in the UI must be the real printed sizes in meters, or every distance EagleEye reports will be wrong by that same scale factor.
Tape the board flat to a rigid, flat surface. A curled sheet ruins the calibration.
2. Open the calibration tool
- Open the Utils tab.
- Select the camera in the Camera dropdown.
- Click Calibrate Camera.
Expected result: a modal opens with a live camera feed on the left and capture controls on the right.
3. Enter your board settings
Fill in Squares X, Squares Y, Square m, and Marker m with your measured values. The marker size must be smaller than the square size. The tool rejects the settings otherwise.
The live-resolution selector controls only how large the preview is streamed to your browser. Use a smaller setting if the preview is choppy over a slow link; it does not change the calibration.
4. Capture frames
Hold the board in view and click Capture for each pose. Aim for 15 to 25 frames that differ from each other:
- Board centered, filling most of the frame.
- Board in each corner of the frame.
- Board tilted left, right, up, and down, with roughly 20 to 45 degrees of tilt.
- Board close and far.
- Do not rotate the board flat in the image plane only; tilt is what constrains the lens model.
Hold still for each capture. Motion blur is the most common cause of a bad calibration.
Expected result: the status text confirms the capture and the frame appears in the captured-frames list. If a capture is rejected, the board was not found. Move closer, add light, or reduce glare.
The upper preview marks every detected ChArUco corner. The lower plot shows where the captured corners cover the image. Spread captures across that plot instead of collecting many nearly identical views in the center.
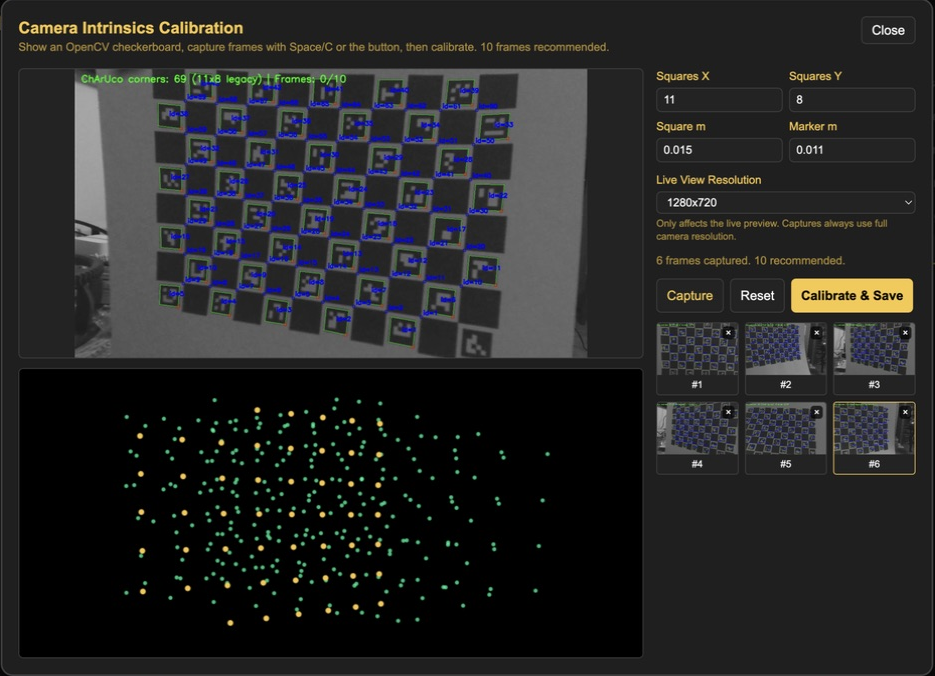
Use Reset to throw away all captures and start over. You can delete individual frames from the captured-frame list if one was blurry. The tool accepts at least three valid frames; collect 10 or more varied frames for a dependable calibration.
5. Run the calibration
Click Calibrate & Save when you have enough frames.
Expected result: the tool reports success and the Utils tab now shows an intrinsics file for this camera. The status line above the intrinsics buttons stops reporting that the camera is uncalibrated and instead shows the saved file.
If it fails, capture more frames with more variety in tilt and position.
6. Verify with the distortion view
Click View Distortion. This shows the raw feed next to the undistorted feed using your new calibration.
Expected result: straight lines in the real world (a table edge, a door frame, the edge of the board) that bow in the raw feed are straight in the undistorted feed. Some stretching at the corners is normal.
Bad result: the undistorted feed bows the other way, or corners smear violently. Re-run the calibration with better frames.
Managing intrinsics files
The Utils tab also lets you:
- Upload Intrinsics: drop in a
.jsoncalibration file from elsewhere for the selected camera. Useful for cloning a known-good calibration onto an identical spare camera, though a real per-camera calibration is always better. - Delete Current Intrinsics: remove the calibration for the selected camera. Nodes that need it will fail to start until you calibrate again.
Troubleshooting
| Symptom | Likely cause | Fix |
|---|---|---|
| Every capture is rejected | Board not detected | More light, less glare, get closer, check Squares X/Y match the printed board |
| Calibration runs but distances are wrong by a constant ratio | Printed square size does not match what you typed | Measure the print and re-enter, then recalibrate |
| Pose is jittery after calibrating | Too few or too similar frames | Recapture with more tilt and corner coverage |
| Modal shows no video | Camera not streaming | Check the Views tab first |
Next: Configure extrinsics.
Verified against EagleEye-Vision-System main at commit c73a871 (2026-08-20). The default
board parameters listed above are the backend defaults for the calibration endpoints.